Add products by adding codes
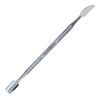


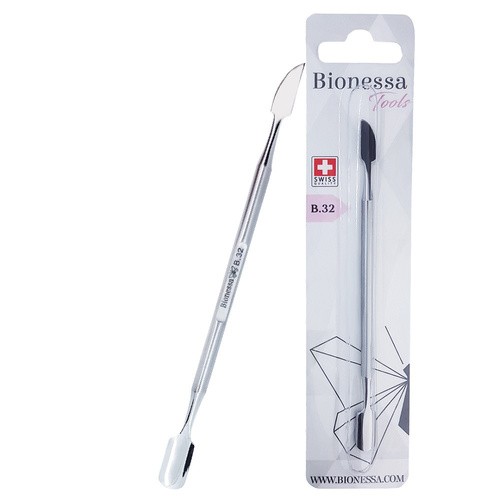
Bionessa B.32 Professional Cuticle Pusher
Product description
Bionessa B.32 Professional Cuticle Pusher
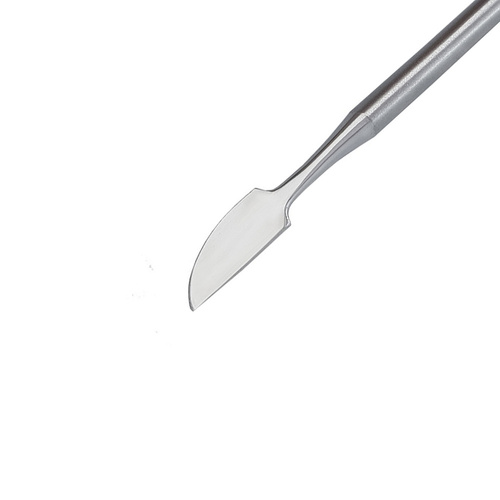
The Bionessa B.32 cuticle pusher was designed with the perfect manicure in mind. Cuticle preparation is one of the most important steps in the procedure, which is why choosing the perfect cuticle pusher is so crucial. Perfectly pushed-back cuticles enhance the appearance and aesthetics of the nail as well as the final result of the manicure. The cuticle pusher is made of the highest quality surgical steel, known for its durability and hardness. Each working part has been handcrafted with attention to every detail. The cuticle pusher features two different tips, ensuring versatile use. The B.32 cuticle pusher fits perfectly in any hand, guaranteeing maximum comfort during use thanks to its slim and ergonomic shape.
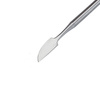
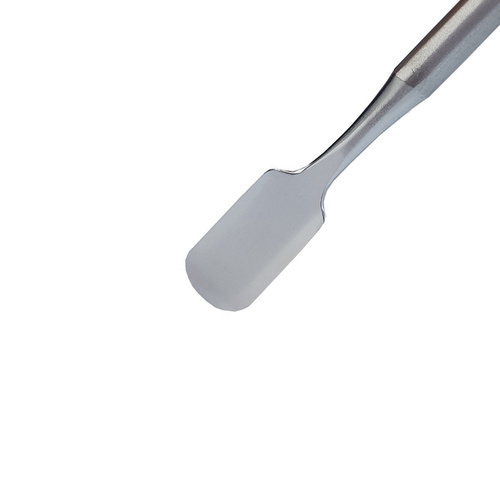
Professional manicure cuticle pusher:
- length of the slanted working edge 15 mm (+/- 0.5 mm),
- width of the rounded working edge: 9 mm (+/- 0.5 mm),
- stick length: 130 mm (+/- 1 mm),
- handle thickness 5 mm (+/- 0.5 mm),
- hand-sharpened edges,
- matte-polished finish,
- made of surgical steel,
- product intended for disinfection and sterilization in an autoclave.
Proper use and storage of Bionessa tools:
- use the instruments only for their intended purposes
- Always store the instruments with the blades facing upward
- avoid dropping or striking the instruments to prevent damage to the cutting edges
- Store the instruments in a dry place and in their designated packaging. The air in the room should be dry, and the instruments should not be stored in plastic bags. This restricts airflow and can cause water vapor condensation, which is highly detrimental to steel.
- Tools should be handled with great care. Some mechanical damage is invisible to the naked eye. Blades, tips, and mechanisms require special attention.
Proper maintenance of Bionessa tools:
Remember that the proper cleaning, disinfection, and sterilization process should be performed after each use of the instruments.
Cleaning: Thoroughly clean the instruments of any dust, tissue, nail, or hair residue using a brush. Then rinse the instruments with distilled water*.
* Use distilled water for cleaning to prevent discoloration and rusting of the tools. Tap water contains minerals that can leave deposits on the tools and adversely affect the sterilization process.
Disinfection: You can perform the disinfection process in a container filled with a disinfectant solution or in an ultrasonic cleaner using solutions designed for this purpose. Make sure the instruments are completely submerged in the solution. After disinfection is complete, remove the instruments and let them dry completely*.
* Cleaning/disinfecting solutions should be prepared according to the instructions on the product label. We strongly recommend adhering to the solution concentration—this has both hygienic and economic implications. Too high a concentration can damage the instruments, while too low a concentration will fail to disinfect certain microorganisms.
Sterilization: The sterilization process for instruments takes place in an autoclave. The recommended sterilization method is steam sterilization under pressure at 134° Celsius (do not exceed 200°). The sterilization process must be carried out in accordance with the instructions provided on the sterilization device. Remember to open all instruments so that sterilization covers every part of the instrument. Before sterilization, lubricate the moving parts of the instruments with a special lubricant. For steam sterilization, we recommend using a water-soluble lubricant.